
Google open-source guru Jean-Baptiste Queru has announced on the Android Building group that the Android 4.2.2 source code will shortly begin pushing to AOSP -- the Android Open-Source Project. The build number is the same as what's now being pushed to Nexus devices -- JDQ39 -- and the tag is android-4.2.2_r1.
In addition, proprietary bits for all supported devices have been published online, and Android 4.2.2 factory images are also available from Google's developer site. Significantly, JBQ points out the Nexus 4 and Nexus 7 (all variants) now have a full set of proprietary binaries available online, bringing full AOSP support to these devices.
Good news for those wanting to roll their own Android, as well as anyone looking forward to Android 4.2.2 ROMs for other devices. Download info for the Nexus binaries can be found at the link below.
More: Google Developers
Create Finder method for Service builder in liferay
In my last article on Creating Service layer with Service builder in Liferay we
have seen how to create service layer for each entity in liferay
through service builder. We took Student entity to understand it.
In this
article we will see some useful trick to add custom method in service
layer. We will go ahead with the same example that we took in Creating Service layer with Service builder in Liferay article, So I strongly recommend to go through it before starting this article.
Follow all the steps in last article (Creating Service layer with Service builder in Liferay) and create the student entity. After service build, it will create the StudentLocalSerciceUtil class with following methods.

If you observe, this class contains basic CRUD methods. Many business scenarios, we need to get data based on some condition.
For example, If I want to fetch all the students who are in standard 8, there is no direct method available. At max we can call getStudents method (Which will return all students) and then from the list we can take 8th standard student programatically. But this is not efficient way. In case of let say 10000 students, if the total no of 8th standard student is just 30, then there is no meaning to fetch all 10000 students.
Liferay provides finder method technique to achieve this. Let us see how to write finder method.
So far now, we have created the student entity as per below snippet(I am omitting DTD definition).
- <entity name="Student" local-service="true" remote-service="false">
- <column name="studentId" type="long" primary="true" />
- <column name="name" type="String" />
- <column name="age" type="int" />
- <column name="fatherName" type="String" />
- <column name="motherName" type="String" />
- <column name="standard" type="int" />
- </entity>
We are going to add finder method in this entity. Generally finder methods are build on columns so first we need to identify on which column(s) we want finder methods.
In our case we want to search all the students who are from 8th Standard. So we will write finder method on column standard. We will add the finder element for standard column so that finally it will looks like below snippet.
- <entity name="Student" local-service="true" remote-service="false">
- <column name="studentId" type="long" primary="true" />
- <column name="name" type="String" />
- <column name="age" type="int" />
- <column name="fatherName" type="String" />
- <column name="motherName" type="String" />
- <column name="standard" type="int" />
- <finder return-type="Collection" name="Standard">
- <finder-column name="standard"/>
- </finder>
- </entity>
Explanation:-
- We have defined one element (finder) inside student entity. This will create finder method for column standard.
- The value of return-type is Collection which means that the return type of finder method will be List<T>.
- The value of name attribute will be used to construct finder method name. We gave Standard so the generated finder method name will be findByStandard().
- Note:- You can give any value in name attribute of <finder> element. The only thing you need to make sure it to give first letter as capital. It will still work if you give first letter small. But then the method name become findBystandard() which should be findByStandard() (Camel Case as Java coding standard).
- <finder-column> element Inside the <finder> element represents the column name.
- the name attribute of <finder-column> element represents the name of the column. It should have exact same name as <column>'s name attribute of which we want finder method.
- StudentPersistence.java (under /WEB-INF/service/com/opensource/techblog/myservice/service/persistence/)
- StudentPersistenceImpl.java (under WEB-INF/src/com/opensource/techblog/myservice/service/persistence).
The first is the interface and the second is it's implementation. You will observe that the method findByStandard(int standard) is created in above interface and class.
The only class accessible outside the service builder is StudentLocalServiceUtil.
This class (StudentLocalServiceUtil)
can be used to perform CRUD operation. We need to make sure the finder
method is also available in this class. (to access it in our portlet
class).
So let us see how to achieve this. Our half work is done (finder method is available in persistence class).
If you remember from previous blog (Creating Service layer with Service builder in Liferay), the only service class that is available to add custom method is StudentLocalServiceImpl.java (available under WEB-INF/src/com/opensource/techblog/myservice/service/impl).
Open this class and you will observe that by default there is no method
defined.
Add following method in this (StudentLocalServiceImpl) class.
- /**
- *
- * @param standard
- * @return List<Student>
- * @throws SystemException
- */
- public List<Student> getStudentForStandard(int standard) throws SystemException{
- return this.studentPersistence.findByStandard(standard);
- }
Explanation:-
- We first declare method (getStudentForStandard) which takes standard as input and return the list of the students who are for specific standard.
- The name of the method can be taken any thing that you feel relevant since its our custom method. The same signature method will be created in StudentLocalServiceUtil class on next service build. The method inside the StudentLocalServiceUtil will call the corresponding method of StudentLocalServiceImpl class.
- Next we are calling this.studentPersistence.findByStandard method.
- This is because StudentLocalServiceImpl method extends StudentLocalServiceBaseImpl class and this (StudentLocalSeriveBaseImpl) class having reference of persistence (StudentPersistence) class.
- After the first service run the finder method is created in persistence (StudentPersistence) class which is accessible now in StudentLocalServiceImpl class.
- So we are simply calling finder method from persistence class and pass the standard which gives the list of student for that particular standard which finally we return of this method (getStudentForStandard).
- Next, just run the service builder once again and refresh the project structure. This time you will observe that the corresponding method (with same signature of what we defined in StudentLocalServiceImpl class) is created for StudentLocalServiceUtil class as per below screenshot.

Open StudentLocalServiceUtil class and check the method getStudentForStandard(int standard). The following are the facts about it.
- It has same method signature that we defined in StudentLocalServiceImpl class.
- It will internally call the corresponding method of service class.
- If you do any change in method signature defined in StudentLocalServiceImpl, it will create new method in StudentLocalSericeUtil class. The old method will not be vanished.
And that is all done. Try to create more finder method for other columns and check how the code is generated.
Feel free to give suggestion / ask questions.
Top 5 security Myths about Linux; and their realities
Linux, unfortunately has been long
surrounded by myths. Despite the speedy adoption of Linux as mainstream
operating systems for enterprises particularly, the common
misconceptions about Linux seem to continue. The post enlists five
traditional myths about Linux Security and attempts to debunk each;
discussing real facts.
There exist mainly two schools of
thoughts regarding security of Linux. One group that assumes ‘ Linux is
Virus Proof’ and the other, advocating a completely contrary thought
i.e. ‘Linux is more insecure (when compared to contenders), as it makes
source code available to everyone’. Let’s investigate in detail.
Myth 1: Linux is insecure, as it makes source code available to everyone.
Reality: While this is
true that Linux makes Source code available to everyone to view and
inspect; it is this open source nature that makes Linux superior to any
proprietary OS in terms of security. As the source code is available to
anyone, thousands of develops around the world scrutinize the source
code for security pitfalls. Imagine, even at this very moment number of
people are reading and making the code better. It is far more easier to
spot and fix security issues on Linux than on any closed-source
platform. Additionally, if any security vulnerability is found on
closed source platform, it cannot be readily altered to make the
software secure. On the contrary, in case of open source software, if
any security hole is discovered patches are created as quickly as
possible (usually within hours) therefore the security flaw doesn’t last
for long enough to be exploited.
When asked about the lack of viruses
known for Linux platform, the proprietary camp claims that Linux is not
very popular to have viruses. This comprises another common Myth.
Interestingly, it’s not only the proprietary camp to believe that Linux
lacks virus because of its minimal market share, alot of literature on
the internet and in books we find this misconception.
Myth 2: Linux lacks virus because it is not very popular.
Many say that the purpose of virus writers is to bring massive destruction. As Linux does not run on as many computers as MS’s Windows does, virus writers only target Windows to damage more and more stations. While this might not be completely wrong, it’s not completely true too.
Reality: Linux might
not run on many desktop computers, BUT it runs on most computers in very
important places. All super computers run Linux. Many notable
governments have approved policies moving governmental computers to
Linux. Additionally there was a huge enterprise shift from Proprietary
OS to Linux in last 2000s recession. That means Linux, too is a very
charming opportunity for hackers; rather hackers would more likely to
write virus for Linux than for Windows if they want to bring even more
destruction (especially destruction in terms of quality then quantity!).
Therefore, the myth can easily be ruled out. Another reason that the
proprietary camp gives for lesser known viruses for Linux is that Linux
is an advanced OS and can only be used by professions who know how to
protect their systems.
Myth3: Linux is for experts who
know how to protect their system and therefore Linux does not get
viruses and it generally thought as secure
It is also a common misconception that
because Linux is for experts, they know well how to deal with viruses.
On the other hand, Windows, as being a simpler system is usually used by
even non-technical people who are naive enough to get virus and destroy
the whole system.
Reality: The concept ‘
Linux is for experts’ is itself a myth and quiet out dated now. Linux is
now one of the friendliest OS out there that can be used by novice and
experts both. There are Linux based computers dedicated for elderly
(heard of the Wow computer?). So to say that Linux is for experts is not
true. Linux is for everyone. Consequently to say, the Linux doesn’t get
virus because of its technically strong to defend OS is wrong.
What makes Linux secure is neither its
lack of popularity nor its technically strong user base. It is the
strong architecture of Linux which makes it secure. On Linux systems
users do not have “root” privileges; instead they possess lower-level
accounts. As a result even if a Linux system is somehow compromised, the
virus shall not have root access to bring about any major damage to the
system. Windows supports exe files, a format in which virus are
transmitted. Linux, on the other hand does not support .exe files. Linux
uses configuration files in place of registry files hence closing this
door for virus. For the Linux servers now, Linux servers employ several
level of security. Linux servers are updated more often. To conclude,
it’s the Linux architecture that is different from that of contending
proprietary OS which makes it secure. That is to say if Linux is adopted
in main stream desktop computing, I am sure that Linux will prove to be
more strong and less incline to get virus than contending OS.
Does that mean Linux is virus free? This comprises of our third Myth.
Myth 4: Linux is virus free
Reality: while Linux is
very secure and superior to its proprietary counterparts, it’s not
virus free. There are a number of viruses known for Linux. I have
compiled popular known viruses in this post. It may be noted that all
most all the viruses known for Linux are non-destructive in nature (but
not non-existent)
Myth 5: On Linux system you don’t need an Anti virus.
Reality: Yes indeed
it’s very much true that when you are running Linux OS you are secure.
Never the less one must realize that no OS is 100% secure. While this
might not be very important for desktop/home users; enterprise sector
which use Linux, may require anti-virus. Occasional scanning, backing up
data and checking your system for malicious software does not bring
harm to anyone. This does not mean you need to spend substantial amount
of cash on expensive anti- virus softwares. Any free or open source and
free antivirus would do justice to your security!
For questions please refer to our Q/A forum at : http://ask.unixmen.com
Source: http://www.unixmen.com/top-5-security-myths-about-linux-and-their-realities/
Zpanel- A good opensource alternative to Cpanel
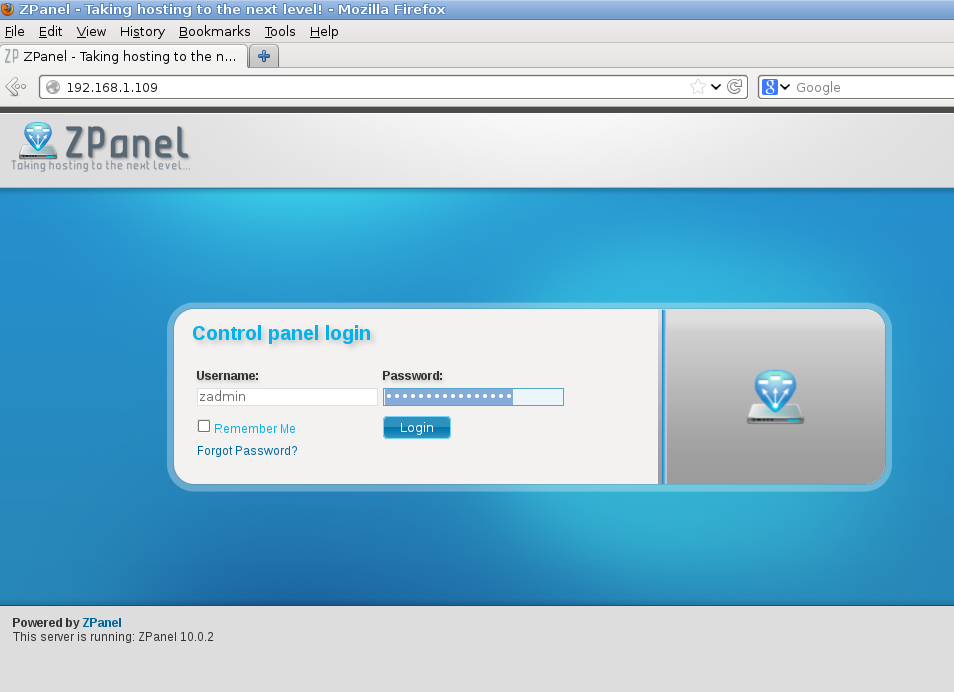
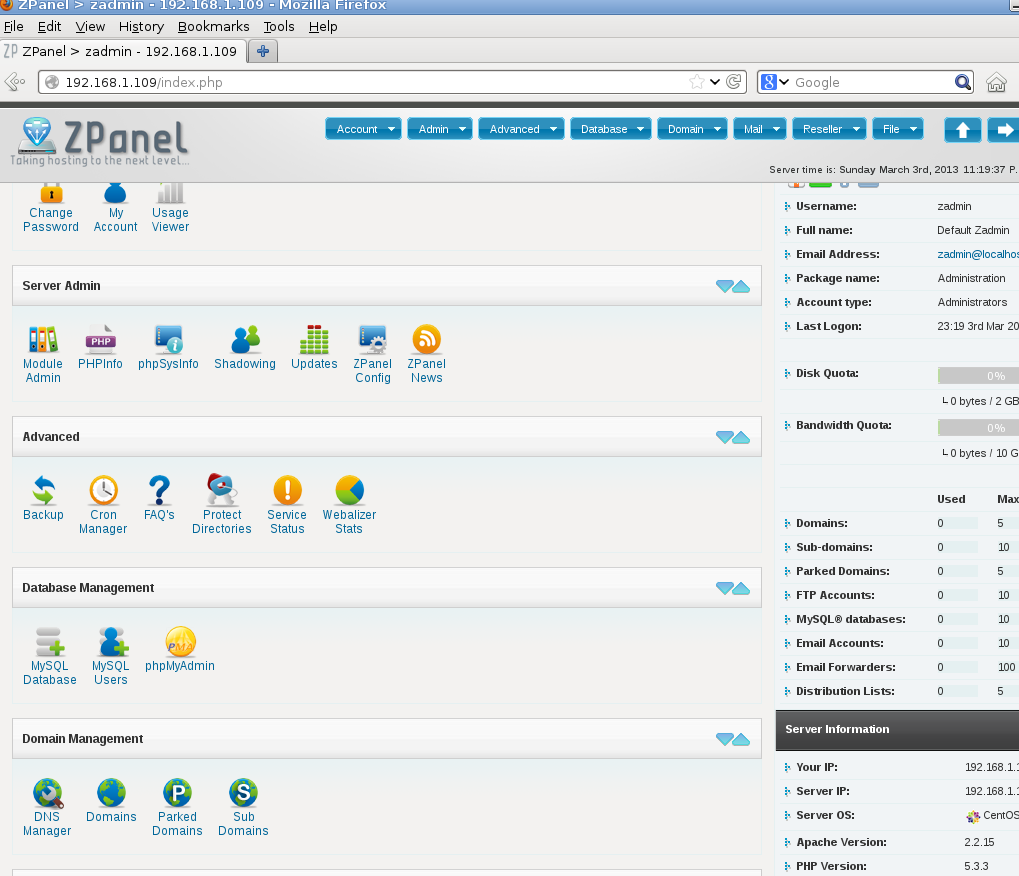
For every paid software, always you can find an opensource alternative, sometimes the alternative is better and complete like (Gimp vs Photoshop) sometimes not. Today we will see a good alternative to Cpanel, the well known paid hosting / server panel, it is zpanel.ZPanel is a free to download and use Web hosting control panel written to work effortlessly with Microsoft Windows and POSIX (Linux, UNIX and MacOSX) based servers or computers. This solution can turn a home or professional server into a fully fledged, easy to use and manage web hosting server.Zpanel is easy to install and to configure. In this tutorial i installed Zpanel in CentOS 6.3.
1- Before to start we need to install some requered dependencies:
yum install ld-linux.so.2 curlwget http://www.zvps.co.uk/sites/default/files/downloads/centos-6-3/package/installer-x86_64-install.sh.x.tar.gz tar -zxvf installer-x86_64-install.sh.x.tar.gz
4- Make the script executablechmod +x installer-x86_64-install.sh.x
5- Run the script:./installer-x86_64-install.sh.x

- Accept the Licence
- Set up the time zone
To contine please agree to the GPL license (y/n/q)? y
Find your timezone from : http://php.net/manual/en/timezones.php e.g Europe/London
Enter Your Time Zone: Europe/Amsterdam
- Insert the Install version and the Domainname , Ip address and the password you want to make for your root Mysql access and GO!!!
Install fresh ZPanel server or enter an upgrade version number e.g 10-0-1 :install
Enter the FQDN of the server (example: zpanel.yourdomain.com): zpanel.unixmen.com
Enter the Public (external) IP of the server: 192.198.1.109
MySQL Password is currently blank, please change it now.

Password you will use for MySQL: ******
Re-enter the password you will use for MySQL: ******

ZPanel will now install, are you sure (y/n/q)?
6- Installation Complted and Zadmin password had been generated.

The Server will restart automatically.
Please connect to http://IP and login with zadmin user and the password generated
and is done.
If you have any questions please post them in :http://ask.unixmen.com thanks.
For questions please refer to our Q/A forum at : http://ask.unixmen.com
Difference between ext2, ext3 and ext4 filesystem in linux
It is always a question in our mind what are the basic difference between ext2, ext3 and ext4 filesystems.So here is the answer for you,
ext2 :
- Introduced with kernel 1.0 in 1993
- Flexible can handle upto 4TB
- super block feature increase file system performance
- ext2 reserve 5% of disk space for root
- ext2 is popular on USB and other solid-state devices.
This is because it does not have a journaling function.
so it generally makes fewer reads and writes to the drive,
effectively extending the life of the device .
- NO journalalizm
ext3 :
- Provide all the feature of ext 2 + journaling and backward compatibility .
- can upgrade ext2 to ext3 without loss of data.
- journaling feature speed up the system to recover the state after power-failure
or improper mount unmount etc.
- Example: In ext2 in an improper unmount or in-between power-off etc.. so in time
of receiver it checks whole file system .
But in ext3 it keeps record of uncommitted file transactions and checks applied
on on them so system will come back up in faster and quicker .
ext4:
- Introduced with kernel 2.6.28
- Ext4 is a deeper improvement over Ext3
- support larger filesystem, faster checking, nanosecond timestamps,
and verification of the journal through checksums.
- It is backward and forward compatible with versions 2 and 3, so we can
mount a ext2 or ext3 filesystem as ext4 .
- The main benefits that ext4 has over ext3 are:
- faster time-stamping
- faster file system checking
- journaling check-sums
- extents (basically automatic space allocation to avoid fragmentation)
What is Journalism in linux file system ?
A journaling is a file system, that keeps track of the changes that will be made in
a journal (usually a circular log in a dedicated area of the file system) before committing them to
the main file system. In the event of a system crash or power failure, such file systems are quicker
to bring back online and less likely to become corrupted.
Hope, now you understand the difference between ext2, ext3 and ext4 filesystem in linux.
Source: http://www.rohitshrivastava.com/blog/2012/12/difference-between-ext2-ext3-and-ext4-filesystem-in-linux/
Cable Armour
Submitted by Sebastian on Sun, 03/03/2013 - 14:50

The Problem
Many consumer connector standards (USB, HDMI, etc.) have found their way into professional camera technology and this brings the problem that they don't lock to the device they are attached to with them and that they are rather vulnerable to damage when sideway force is applied to the connector. Shooting in the field and having several cables hanging from the camera and not having a way to secure them in place is really cumbersome and has often lead to broken connectors or problems with devices being disconnected accidentally.The Solution Concept: Cable Armour
The idea is to not require a special cable or a special connector but provide a protection system that can be used in addition to existing connectors.- works with almost any connector
- locks from accidental cable unplugging
- minimal integration effort necessary
- protects cable connector from sideway forces
- can be made from plastic for medium protection strength or aluminum for maximal protection strength
Patent pending?
Absolutely not! We release this as open hardware for anyone to use and build upon - be fair and do the same when you use this as foundation of your own solution

No comments:
Post a Comment